Outlet Details
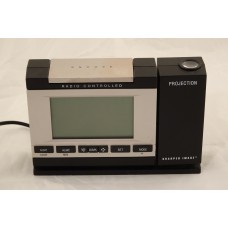
Small alarm clock that can project the time and gets time updated via radio signals.
Used; good condition. Includes clock and power adapter.
Manual instructions:
Sharper Image LM521 Digital Clock
PROGRAM/MANUAL SETTING MODE
After inserting the batteries:
The whole LCD screen lights up showing the different settings, etc.
After several seconds, the LCD screen clears and displays:
A flashing antenna
Upper left hand side of the LCD display. USA Time Zone Map
Middle right side of the LCD display (if necessary, to see, remove and reinsert batteries).
WAIT FOR AUTO TIME SET
A flashing antenna
> This indicates the clock is trying to auto set the time according to the WWVB radio/satellite time signal. Set on windowsill for best chance of success.
If it can't detect the signal, mannual setting is required, starting with the time zone.
> Manually set time ONLY if you are absolutely certain the WWVB signal cannot be found. Otherwise any manual time setting will be auto set to the WWVB time when its signal is detected, which may be many hours later.
SET USA Time Zone
1.) Press "SET" -- US time zone
> press "MODE" repeatedly until the desired time zone is reached.
5 = Eastern standard time (default setting)
6 = Central standard time
7 = Mountain standard time
8 = Pacific standard time
9 = Alaskan standard time
SET Offset Hours to Compensate for Satellite Signal
2.) After step 1.) above, press "SET"
A flashing "-7h" (minus 7 hours, default) and flashing USA Time Zone map appear.
This default setting worked just fine in New Mexico, MST, and may also work for your time zone as well.
> Press "MODE" to set from "-0" to "-12h" (minus 0 to 12 hours).
> Set to "-0h" if the satellite time signal set your clock to the correct time for the US time zone you live in.
> Set from "-1h" to "-12" to offset the time set by the satellite signal in case it does not match the time in your time zone. (E.g., 3pm -1h = 2pm.)
> NOTE: The default setting is -7h. If the satellite signal resets the time, say to 9pm, the time displayed will be 2pm (9pm-7h)--but if it should display 5pm instead to match your time zone, then set offset to -4h. Hence, the need to correctly set the offset hours if the -7h default value does not work for you.
SET Daylight Savings Time (DST)
3.) Press "SET" -- DST (Daylight Savings Time)
> Press "MODE" to set ON/OFF
SET Time
4.) Press "SET" (5no = seconds)
"5no" displays, plus flashing bars for seconds (not minutes as it falsely seems).
> Press "MODE" to set from 0 to 60 seconds
5.) Press "SET" (set hours)
> hour bars flash > press "MODE" to set hours
6.) Press "SET" (set minutes)
> minute bars flash > press "MODE" to set minutes
SET Date
7.) Press "SET"
> press "MODE" set year
8.) Press "SET"
> press "MODE" set month
9.) Press "SET"
> press "MODE" set day
SET Week Day
10.) Press "SET"
> press "MODE" set week day, Mom through Sun (Mo is default)
SET Standard (12) / Military (24) Time
11.) Press "SET"
> Press "MODE" set 12/24
CEILING DISPLAY:
SET/ROTATE Ceiling Projected Time/Temp Position
12.) Repeatedly press button with four tiny arrows pointing opposite each other (rightside of "DSPL" button) until the Time/Temperature display on the ceiling is oriented how you want it.
SET Ceiling Projection Brightness, or turn off
13.) Pressing button with sun symbol (leftside of "DSPL" button) cycles ceiling display from off, to brightness levels 1, 2, and 3.
SELECT between Ceiling Projected Time, Temp or Both
14.) Pressing "DISPL" repeatedly cycles between M0 (time), M1 (temperature), M2 (time & temperature auto switch every second or so).
Sharper Image Projection U.S. Atomic Alarm Clock
- Product Code: LM521
- Availability: Out Of Stock
-
$5.00
Tags: electronics

